Sunday, February 24, 2019

Braised Beef Shank

Was looking for a full pork shank to braise ala oso bucco.  Alas, all PCC had was cross cut beef shank.  But it did look good, so I figured what the heck.  Basically I made it just like braised beef short ribs but a one day vs. two day process.  The end result was a lusciously syrupy sauce compliments of reducing the slow braise liquids, the marrow in the bone, and some cheating **.  Nice thing about beef shank is it is usually pretty economical.

Recipe can be scaled up for more servings.  Below made two servings.

INGREDIENTS

(2) Beef shanks, bone in, about 3/4 lb each
(1) Onion chopped
(2) Carrots chopped
(2) Celery stalks chopped *
1/2+ bottle of full bodied red wine
(3) + cups beef broth
Tomato paste concentrate
Anchovy paste concentrate
Bay leaf
Salt and pepper
Oil
Butter
Thick sliced mushrooms

[* full disclosure: I didn't have celery when I made this but would have used it if I did...]

INSTRUCTIONS

In a large dutch oven ala Le Creuset, sear/brown seasoned meat in oil on high heat.  Remove to a plate.

Turn heat down and saute onion, carrot and celery until translucent in same pot.

Add wine to vegetables and reduce about in half.  After reduced, add beef broth, about 2 teaspoons of tomato paste concentrate (or 2" from a tube), and one teaspoon anchovy paste (or 1" from tube), and bay leaf.  Stir and bring back to simmer, add beef broth, meat and any juices back and make sure liquid covers.  

Cover with lid and put in 300 degree oven for about 2-3 hours.

Remove from oven, remove meat to a plate and cover and keep warm in oven now turned off.

Strain braising liquid of all the veggies, squeezing out liquid from veggies through strainer.  Return to pot and reduce until it starts to get a little saucy.  [** Sometimes I help this kind of sauce along by adding about 1/2 packet of unflavored gelatin to thicken.]

Add mushrooms to large preheated pan on medium high heat and brown in butter.

Add meat and any juices back to sauce and baste with the sauce frequently until it gets really saucy.  Add browned mushrooms during this process, but not before.

Once reduced to (almost) perfect saucy goodness turn off from heat and let sit for about 5 minutes in warm pot continuing to baste and the sauce will finish thickening.  Serve either by itself or over rice or a mash.


Sunday, January 27, 2019

Fluffy Egg Casserole

I wanted eggs light and fluffy, ala Prince Omelette of Vegetales fame.  So of course I googled “fluffy egg casserole” and came up with this eggscellent recipe:  https://www.crazyforcrust.com/cheesy-egg-casserole/

I substituted sour cream for the cottage cheese called for due to a shopping failure, but actually liked the slightly tangy result.  Added mild green chilies and PCC pork sausage bits (pre-cooked so the fat was already rendered and it was a little brown).  Our convection oven seemed to brown it too fast at the recommended cooking team, so I reduced it part way to 325.  Enjoy!


INGREDIENTS

 1/2 cup unsalted butter, melted
 1 16 ounce package cottage cheese (or sour cream)
 2 cups shredded cheese (I used mozzarella but wanted to use pepper jack)
 1/4 cup all purpose flour (GF or regular)
 1 teaspoon baking powder
 1/2 teaspoon salt
 10 eggs — lightly beaten

INSTRUCTIONS
Preheat oven to 400°F.  Use a non-stick pan or pre-grease or spray a baking dish.

Stir together butter, cottage cheese, mozzarella cheese, flour, baking powder, seasoning or add-ins, and salt. Whisk in eggs to mixture until combined (result will be lumpy).

Pour into prepared pan and bake for 30-40 minutes or until browned and set in the middle. Cool 5-10 minutes before slicing and serving.


Sunday, July 08, 2018

Meat Candy (aka crack)

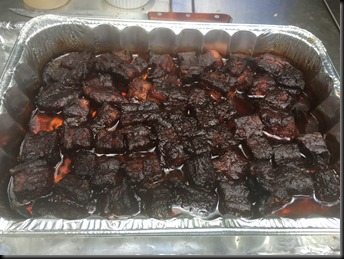
Smoked, Braised and Caramelized pork belly.  Inspiration taken from here:  Vindulge

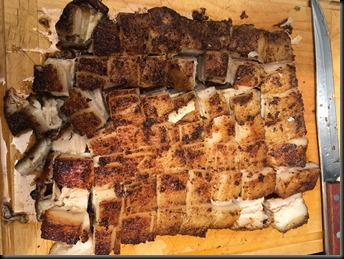
Took about 4 lbs of fresh pork belly purchased from butcher shop, center cut.  Scored the fat side about 1/2" deep and rubbed with pork rub the night before and wrapped with plastic and refrigerated over night.  Smoked with apple wood fat side down for about 4 hours then flipped over and smoked for another 2 hours until it got brown and internal temp was close to 180.  Cut the cubes all the way through and transferred to aluminum pan and coated with some honey/sugar rich BBQ sauce.  Covered with foil and braised in the oven at 300 for a couple hours. Uncovered and drained fat off, added a little more BBQ sauce and then caramelized in the oven for another couple hours.


Finished Product


2018-07-07 16.28.54

Braised before caramelizing

2018-07-07 12.50.39

Smoked and cubed, ready for braising

2018-07-06 18.56.34

Pork belly fat side down with rub on


Tuesday, December 27, 2016

Lasagna and Home Made Ragu

I did a bunch of lasagna research and found that béchamel based lasagna is Northern Italian and Ricotta based is Southern Italian.  I found one Giada recipe on Food Network that had both which I didn’t find anywhere else.  One day I will try doing a béchamel lasagna, but so far I always punt on that cause I am tired of cooking by assembly time. Instead of making separate tomato sauce and then sprinkling on the meat, I make a ragu.  And instead of layering the ricotta and spinach separately, I mix them together first.  The quantities below make either two medium size lasagnas or one really big one and will feed 12 adults. 

Ragu sauce (make day ahead or some other day and freeze)
  • 1.3 lbs of mild Italian sausage
  • 1.3 lb of ground chuck
  • 2 cans 28 ounces diced tomatoes (good ones will make a taste difference)
  • 1 can 28 oz crushed tomatoes
  • Chicken broth
  • Garlic
  • 1/2 tsp cayenne
  • Red pepper flakes
  • 2 medium yellow onions chopped
  • 2 carrots finely chopped
  • 2 celery stalks finely chopped
I used a big Le Creuset for all of this:

Cook and render the meat slowly, and then drain the meat. I recommend not browning, but keeping the meat soft.  Make sure to cook and drain thoroughly or you will end up with greasy lasagna. Remove to a paper towel lined bowl.  Saute the veggies in the same pot in some olive oil until soft (add chopped garlic at end).  Add the meat back and all the tomatoes, some black pepper (the sausage usually is salty enough) and a couple bay leaves and cayenne. Add broth if it seems too thick.  Cook covered in the oven at 275 for 3-4 hours.  When done, it will have a totally different consistency, everything blended together and actually not very saucy.  If you don’t cook it this long the flavors just don’t happen and it will taste like raw tomatoes with some meat and very bland.  This is great for just topping pasta BTW.

[2022/23 update:  This Ragu comes out really thick and not at all “saucy”, which is intentional.  What I have found however is that it is hard to “stretch” it enough for all the layers.  I have started using some puréed italian tomatoes with some light italian seasoning and salt and pepper and brushing that on the noodle layers before the Ragu]

I mixed two packs of chopped spinach (after thawing and squeezing all the water out) with two 16 oz containers of ricotta and 3 lightly beaten eggs. 

Olive oil sprayed the baking dish then layered:
  1. Thin layer of the ragu on the bottom of the pan [2022/23 update: use the sauce noted above instead for this base layer.]
  2. Single layer of noodles (regular or GF)
  3. 2022/23 update thin layer of the sauce brushed on
  4. Ricotta and spinach layer
  5. Shredded mozzarella cheese
  6. Ragu (with a very light sprinkle of red pepper flakes)
  7. Noodles
  8. 2022/23 update thin layer of the sauce brushed on
  9. Ricotta and spinach layer
  10. Ragu (with a very light sprinkle of red pepper flakes)
  11. Shredded mozzarella cheese
  12. ¼ cup of grated parmesan or Romano.
Cover loosely with foil (I kind of tented it so the moisture could escape) and bake at 375 for somewhere between 45 minutes and an hour + till all bubbly, then uncovered for about 15 minutes to brown.  I put a foil covered baking sheet under it, which protected the oven and made it easier to take out. Then let it rest for a full 30 minutes.  

A few tips:  if you spray the foil it isn’t supposed to stick to the cheese. The resting time is essential or you will end up with soupy lasagna.  Make the Ragu a day or more before, otherwise it will be really hot when assembling and your lasagna dinner it will take All. Day. Long. I haven’t got the thick chewy noodle layers I like in good lasagna yet - I suspect the oven ready no boil noodles. 

*** 2023 “Quick and Smaller Lasagna” 

I am trying to perfect a decent lasagna that you can get in the oven in 30 minutes total.  Below is first attempt with my notes for next time:

Smaller lasagna dish that perfectly fits 3 noodles un-trimmed in each layer.
32 oz jar of Rou’s sauce, preferably bolognese.  Don’t go cheap on the sauce, this is where the flavor comes from.
1lb of mild italian sausage
24oz of ricotta + 2 eggs
Frozen spinach
Shredded Moz
Grated parm

Cook the meat, drain it, and add the jarred sauce but reserve a little
Do layers like above, but use the jar sauce for the first thin sauce layer
Instead of thawing out the spinach and then draining it, sprinkle frozen bits on the ricotta layer
I would add some heat next time like cayenne pepper to the sauce.  Didn’t have enough punch.

I was able to assemble from a “clean counter” to putting it in the oven in 30 mins.  Not as good as using home made Ragu, but sometimes you just want Lasagna. 

Ragu and lasagna pictures at different stages:


Sunday, November 27, 2011

Personal Size Apple Crisp

Post Thanksgiving, tragically we had run out of apple pie.  But I had a leftover peeled Granny Smith apple in the refrigerator so I decided to improvise a personal size apple crisp suitable for the application of appropriate amounts of vanilla ice cream.

Referencing an online recipe for crisp topping, I approximated the ratios.  The filling I eyeballed, so some adjustment may be necessary.

Ingredients:

  • 1 large ramekin
  • white sugar
  • brown sugar
  • cinnamon
  • oatmeal
  • flour
  • salt
  • butter
  • 1 large Granny Smith apple peeled

I thinly sliced the apple and in a mixing bowl, combined the apple slices, some white sugar (about 2 tablespoons or so), some cinnamon (about 1/4 tsp) and a dash of salt until well coated.  I put this in the ramekin with enough left over for a small ramekin.

In a 2 cup pyrex measuring dish, I melted 2 Tbs of butter.  I added to that 2 Tbs oatmeal, 2 Tbs flour, 3 Tbs brown sugar, about 1/2 tsp cinnamon and a dash of salt, combined and pressed on top of apple mixture in Ramekin.  There wasn’t enough for the small ramekin too, so it went “naked”.

In a rush to get this goodness in me, I decided to use the combination cook setting on our microwave/convection oven after preheating it to 400 degrees.  In about 15 minutes the apples looked done but the topping not quite.  I changed the oven to convect only at 400 degrees and gave it another about 7 minutes.

After cooling slightly and with the requisite ice cream, it was as good as anticipated.  Yummm.

Before cooking:

IMG_0966

After cooking:


IMG_0967

Saturday, November 05, 2011

Easy Crème Brulee

Though I have successfully made Crème Brulee the “traditional” way, with double boiler, etc., this way is much easier, almost foolproof, and takes less prep time. The quantities below will make 6 small ramekins.

  • 5 egg yolks
  • ½ C sugar
  • 2 C heavy cream
  • 2 tsp vanilla
  • Light brown sugar

Preheat oven to 300 and heat a tea kettle of water to not quite boiling. Prepare a large baking dish like a 9x13 or lasagna pan with the ramekins in it.

Put cream in a small sauce pan and warm gently on low. You do not want the cream hot, just slightly warm to touch, and bring it up to heat slow so the bottom doesn’t brown and you don’t get a skin.

Separate eggs reserving egg whites for something else, and combine egg yolks with sugar and vanilla in a mixing bowl large enough to add the cream later. When cream, water, and oven are all up to heat, add cream to egg yolk mixture and mix well, but don’t beat or whip.

Pour mixture into ramekins up to bottom of lip leaving about ¼”. Add hot water to baking pan and add additional hot tap water if necessary to bring water most of the way up the sides of the ramekin making sure there is enough room in pan so that it won’t slosh over either the sides of the pan or the sides of the ramekins when you move it.

Put pan with hot water and filled ramekins into oven (see note below) and bake for about 45 minutes to an hour until they start to set up and are slightly golden on top.  They will continue to cook in the hot water when removed.

Remove carefully from oven when done and let cool, cover ramekins with plastic wrap and refrigerate overnight.

Right before serving, sprinkle tops with a 1/16” layer of light brown sugar and put on a baking sheet. Mist with a very fine mist of water and place under broiler in oven. Watch carefully and remove when sugar has that caramelized melted look to it. Let cool and serve. For variations, try adding espresso grounds or cocoa to the tops before the brown sugar.

Notes:

  • It can be easier to add water to the baking dish when its already on the oven rack. Removing though still takes a steady hand.
  • Misting the sugar with water prevents the tops of the little lumps of sugar from burning.
  • Heating the cream significantly reduces the cooking time. If it is too hot when you add it to the egg mixture you will get sweet scrambled eggs.
  • Heating the water first significantly reduces the cooking time. Don’t use boiling or really hot water since you risk cracking a dish or turning the outside of the custard to scrambled egg.
  • I have found that the cream to sugar to egg ratio in various recipes varies sometimes significantly, mostly the amount of sugar. The above ratios I have used and seem to work well but you could probably reduce the sugar some if wanted.
Salted caramel with bacon version:

I used the following recipe to up the game.  My modifications were to use my egg yolk to sugar ratio from above; I used bacon salt in the mix; and I added some tiny bits of cooked cottage bacon to the mix.


The above blog recipe has all the good tips and tricks, its very well done.

Picture below is a double recipe in oven just before taking them out.

2011-11-05 20.09.23

Hearty Chili with Beer and Coffee

Hearty Baked Chili
This recipe was adapted from allrecipes.com and is one of my favorite chili recipe to date. And since it only calls for ½ bottle beer, you get to drink the rest of course while cooking.
INGREDIENTS:
  • oil
  • 1-1/2 onions, chopped
  • 2 cloves garlic, minced
  • 1 lb+ steak cut into ½” cubes (I like using a beefy tasting steak such as flat iron or chuck eye, or you can use sirloin)
  • 1 can diced tomatoes. (I use “fire roasted salsa style”)
  • ½ bottle dark beer (a chocolate porter is the very best for this chili)
  • 1/2 cup strong brewed coffee
  • 1 (6 ounce) can tomato paste
  • beef broth (see directions for quantity)
  • 3 TB brown sugar
  • 3 TB chili powder
  • 1 TB cumin
  • 1 TB dried oregano
  • Cayenne pepper or red pepper flakes to taste (start with ¼ tsp)
  • 1 tsp ground coriander
  • Salt and pepper
  • 2 (15 ounce) cans kidney beans (or sub 1 can for pinto)
  • 1 (8oz) can chopped green chilies (I use fire roasted)
  • 2 fresh hot chili peppers, seeded and chopped
Preheat oven to 400 degrees. Put some oil in big dutch oven and heat on stovetop to medium/medium-low. Add chopped onion and chopped peppers. Sauté briefly then add garlic and chopped meat. Mix well and season with salt and pepper. Put in oven for 1 hour uncovered. (Note that you aren’t browning the meat on top of the stove but in the oven.)
After 1 hour, remove from oven to a burner on medium heat. Reduce oven temp to 300. Add the rest of the ingredients except for beef broth. The beans can be added either with their liquid or drained and rinsed. Stir chili well and let it come back up to heat slowly. Add beef broth until amount of liquid is appropriate and consistency is how you want it. Cover pot and return to oven for at least 1 hour.
Remove from oven , test seasonings, and place on low burner uncovered for 20 minutes to rest, stirring occasionally. Serve with your favorite accoutrements like grated cheese, chopped green onion and sour cream.

Easy Chili Recipe (March 2020)

1lb+  chuck stew meat diced
1 onion chopped
2 medium carrots chopped
3 celery ribs chopped
2 cloves garlic minced
1 TBS chili powder
2 TSP Cumin powder
1 TSP dried Oregano
1 can fire roasted diced tomatoes
1 can green chilies
2 cans black beans with liquid
Salt
1 shot espresso
1 TBS brown sugar

In heavy dutch oven, salt and pepper and brown meat in batches, remove from pot
Saute vegetables until soft
Saute garlic lower heat for 45 secs
Add meat back in and rest of ingredients and spices
Add about 1/4 cup water
Salt to taste
Simmer or put in 300 degree oven covered for 2 hours
Check seasonings and add salt if required and simmer on stove top uncovered for 30 mins